Featured Slider

Luv2Stamp Group Blog Hop December 2022


Welcome to the Luv 2 Stamp Group’s 2022 Blog Hop! We are excited to share projects with you again this year. We hope to inspire you to create beautiful new projects. Each month we will have a different theme based on the next month’s celebrations using Stampin’ Up! products.


Once you are done with each post, scroll down to the bottom and you will see a list of Blog Hop participants, you can click on their name to go to their post, or you can click the next button to go to the next post in line. Happy crafting! This month’s theme is new products.


My card features two new Sale-A-Bration products available for free starting January 5th. The star of the show is the Favored Flowers DSP! This paper is stunning!! I also used the Sending Support stamp set. The sentiments are perfect for showing how much you care. On January 5th, you can earn either of these with a $50 purchase or both with a $100 purchase. Can’t wait - ask me how to get them now.


Here is a quick pictorial for making the card base.


Here are the measurements for the card:


Blackberry Bliss Cardstock

(1) 4 1/4” x 5 1/2”, scored at 2 1/8” on the 4 1/4” side

(1) 9” x 5 1/2”, scored at 1/2” and 4 3/4” on the 9” side


DSP

(1) Foral Background 4” x 5 1/4”

(1) Geometric Pattern 1 7/8” x 5 1/4”

(1) Gepmetric Pattern 3/4” x 5 1/4”

Floral Accents fussy cut from DSP


White Cardstock

(1) 4” x 5 1/4” for insert

(1) 5/8” strip for sentiment


To finish my card, I used the Blackberry Bliss Stampin’ Blends marker to color three small pearls. I love the subtle effect of these colored pearls!


Thank you so much for hopping along with us today! Laurie Bradshaw is up next and I know you will love what she has to share!! You can click the next picture below or click on her name in the list below.


Luv2Stamp Group Blog Hop October 2022


Welcome to the Luv 2 Stamp Group’s 2022 Blog Hop! We are excited to share projects with you again this year. We hope to inspire you to create beautiful new projects. Each month we will have a different theme based on the next month’s celebrations using Stampin’ Up! products.


Once you are done with each post, scroll down to the bottom and you will see a list of Blog Hop participants, you can click on their name to go to their post, or you can click the next button to go to the next post in line. Happy crafting! This month’s theme is Halloween.

I love making Halloween treats for friends and family. This year I decided to do some using our Peekaboo Treat Bags. These bags are the perfect size for small candy treats or even a homemade cookie!


The Bewitching Bundle is sooo cute I knew I had to use it! I created two designs one for the craft bags and one for the white bags. It is so fun to change up the colors can make the design look different!

To create my tags, I cut a strip of DSP 1 7/8” x 4”. For the craft bags, I used the small So Saffron gingham print from the Gingham 
Cottage DSP and for the white bag I used the black polka dot from the Black & White Designs DSP. To make the tag top, I used the Label Me Lovely punch. I turned the punch over and fed one end of the DSP into the punch making sure to center the strip and punched.


The hats, legs and the spider are stamped with Memento ink using the Stamparatus. Being able to stamp the images multiple times gives a deep, crisp black image. The striped stockings are colored with Pumpkin Pie Dark, Highland Heather Dark and Granny Apple Green Light blends. The buckles on the boots are colored in So Saffron Dark.


Isn’t the Glitter Washi amazing? I wanted to make some glitter stars and a hat band with the them. The challenge was the washi tape was a tad too narrow for the band and largest star. To fix this, I taped two strips of the washi to a strip of white card stock and the look was seamless. I punched a band in Pumpkin Pie Glitter and then did stars in all four colors.


I fussy cut the witches boots and adhered that to hat using liquid glue. I glued the hat bands to the hats and attached a star on each one with a glue dot. The witches are popped up on the tags with dimensionals. I attached the tag to the bag with liquid glue. I sprinkled some stars around the tag and the treat bag using glue dots and dimensionals. I used the Alphabest bundle to make the Boo! Sentiment at the bottom of each bag.

The tags needed bows but I wanted ribbon in coordinating colors. Blends to the rescue!! I used the Pumpkin Pie Dark color the 1/4” crinkled seam binding and the Highland Heather Dark to color the white Glittered Organdy Ribbon. Love that I can make everything match with a little bit of coloring!!


Thank you so much for hopping along with us today! Tammy Civello is up next and I know you will love what she has to share!! You can click the next picture below or click on her name in the list below.


Christy Frank - CA —> You are here
Tammy Civello - CA
Teri West - AK
Sandra Hernandez - GA
Dawn Sandner - CA
Danielle D. Diaz - NM
Wendy Varron - MD
Kurstan Del Rosario - CA
Gloria Plunkett - GA
JoAnne Hewins - NC
Taleena Koch - WA


Luv2Stamp Group Blog Hop August 2022


Welcome to the Luv 2 Stamp Group’s 2022 Blog Hop! We are excited to share projects with you again this year. We hope to inspire you to create beautiful new projects. Each month we will have a different theme based on the next month’s celebrations using Stampin’ Up! products.


Once you are done with each post, scroll down to the bottom and you will see a list of Blog Hop participants, you can click on their name to go to their post, or you can click the next button to go to the next post in line. Happy crafting! This month’s theme is Birthday.


For this month’s card I wanted to do a fancy fold and went to Pinterest for inspiration. I found a stunning Double Fan Fold card by Carole Baumgartner. Her tutorial is just amazing with pictures included in the step by step instructions - check it out!


Are you guilty of buying a set and not using it? I certainly am! When I was deciding what stamp set and DSP to use for this card, I realized that I ordered the Texture Chic suite and hadn’t used it. One of the reasons I fell in love with it is the imagery and paper are perfect for just about any occasion or season! The florals are perfect for a birthday card!


I also used the Brushstroke Specialty paper to mat the card and to make the leaves in the focal point. The texture of this specialty paper compliments the DSP and gives a pretty sheen to leaves!


The Distressed Gold Specialty paper added to the shine and made a perfect accent for the three flowers framing the sentiment. To adhere the die cut pieces, I used our adhesive sheet. I just love using it for intricate pieces. It is like making your own custom sticker! The sentiment was stamped on the third largest circle in the Stylish Shapes Dies.


I went a little rogue with the color of my flowers. While I used Petal Pink for the card base, I decided that the flowers looked better in Blushing Bride. I think either color would work, but to me the Blushing Bride is a cooler shade and it goes better with the cool tones of the Evening Evergreen and Soft Succulent. I added the Petal Pink Elegant Faceted Gems to the flower centers for a little sparkle.


My favorite die in the Chic Dies set is the mesh background die. I can’t believe I waited so long to use it! It is great for adding interest and texture to your card. Using the adhesive sheets to create a sticker is must for this die! Here it anchors the flowers and sentiment. I chose the wood grain pattern in the Texture Chic because I wanted to bring in a hint of the Evening Evergreen color that is in the DSP mats on the card. It really ties the card together!


Thank you so much for hopping along with us today! Laurie Bradshaw is up next and I know you will love what she has to share!! You can click the next picture below or click on her name in the list below.


Sharon Lim - CA

Christy Frank - CA —> you are here

Laurie Bradshaw - CA

Tammy Civello - CA

Teri West - AK

Dawn Sandner - CA

Kimberly Mull - TX

Gloria Plunkett - GA

JoAnne Hewins - NC

Taleena Koch - WA


Luv2Stamp Group Blog Hop - June 2022


Welcome to the Luv 2 Stamp Group’s 2022 Blog Hop! We are excited to share projects with you again this year. We hope to inspire you to create beautiful new projects. Each month we will have a different theme based on the next month’s celebrations using Stampin’ Up! products.


Once you are done with each post, scroll down to the bottom and you will see a list of Blog Hop participants, you can click on their name to go to their post, or you can click the next button to go to the next post in line. Happy crafting! This month’s theme is New Annual Catalog.


When I first looked through the catalog, the Speedy Recovery stamp set stood out for me. It has such a sweet style and heartfelt messages. I love that the images allow you to stamp in a single color and you can also color the bouquet if you choose. And I just knew the Tea Boutique DSP would be the perfect compliment to the tea cup in this set! The paper features our fabulous new In Colors, so bright and cheery, perfect for get well wishes!!


I love making fancy folds and the Double Box Panel Card fold is a favorite of mine. It is a great way to showcase a focal image or even a large sentiment. It worked beautifully for mixing and matching this stamp set & paper!!


Measurements


Card Base:

Orchid Oasis

1 - 11” x 4 ¼”, scored on the 11” side at ½”, 1 ¾”, 3 ¾”, and 5 ½”


Front Panel:

Orchid Oasis:

1 - 2 ⅝” x 6”, scored on the 6” side at ½” and 1 ¾”


Starry Sky:

1 - 2 ⅜” x 4”


Basic White:

1 - 2 ⅛” x 3 ¾”

1 - 2 ½” x 4 (for stamping)


Mats:

Starry Sky:

1 - 4” x 5 ¼”

1 - 1” x 4”

1 - 1 ¾” x 4”

1 - 1” x 2 ⅜”


Tea Boutique DSP:

Tea Cup & Florals Pattern:

1 - 3 ¾” x 5”


Gingham Pattern:

1 - ¾” x 2 ⅛”

1 - ¾” x 3 ¾”

1 - 1 ½” x 3 ¾”


Stamping


  1. Using Starry Sky, stamp the sentiment at the bottom of the Basic White front panel piece.

  2. Stamp the tea cup image in Starry Sky and fussy cut.

  3. Stamp the bouquet image in Memento Tuxedo Black, then color using the 2022-2024 In Color Blends. I used Starry Sky, Orchid Oasis, Parakeet Party and Sweet Sorbet for mine. After coloring, fussy cut the bouquet.

  4. Optional - stamp an additional bouquet and color the heart on the tea bag tag. Fussy cut the tag.


Assembly


  1. Adhere the Starry Sky mat to the card base front as shown. Then adhere the Tea Cup & Florals mat unto the Starry Sky Mat.

  2. Flip the card base over and adhere the Starry Sky and Gingham DSP to the card base as shown,


  1. Form the box at the bottom of the base by making a mountain fold on all four score lines.

  2. Adhere the ½” scored flap to the card base forming the box at the bottom of the card as shown.


  1. Adhere the Starry Sky and Gingham mats to the front center panel.

  2. Form the front panel by making a mountain fold on both score lines. This section will become the second box on the card.

  3. To attach the front center panel, center the panel on the box at the bottom of the base and adhere just this section as shown.

  4. Then adhere the ½” flap to the card base as shown.


  1. Using dimensionals, attach the bouquet and tea cup images to the Basic White front panel mat above the sentiment. Glue the fussy cut tea bag tag over the one on the bouquet to give a more 3-D effect (I chose not to use a dimensional here because the card is thick already).

  2. Adhere the Basic White front panel to the Starry Sky mat. Now your card is assembled!


Embellish


  1. Make a small bow using the Starry Sky In Color ribbon and attach this to the base of the bouquet.

  2. Add In Color bling to the card as desired.


Thank you so much for hopping along with us today! Teri is up next and I know you will love what she has to share!! You can click the next picture below or click on her name in the list below.

Sharon Lim - CA

Christy Frank - CA —> you are here

Teri West - AK

Sandra Hernandez - GA

Danielle D. Diaz - NM

Wendy Varron - MD

Patty Bennett - CA


Luv2Stamp Group March 2022 Blog Hop


Welcome to the Luv 2 Stamp Group’s 2022 Blog Hop! We are excited to share projects with you again this year. We hope to inspire you to create beautiful new projects. Each month we will have a different theme based on the next month’s celebrations using Stampin’ Up! products.

Once you are done with each post, scroll down to the bottom and you will see a list of Blog Hop participants, you can click on their name to go to their post, or you can click the next button to go to the next post in line. Happy crafting! This month’s theme is Easter.

I had a little problem making this card! I decided that I wanted to do a double Z fold and when my design was done, the Happy Easter greeting was too long and I did not like how it fit. I decided that I would perform stamp surgery and cut the greeting to make two stamps. This would have been perfect except I dropped the Easter half and my little puppy Dolce got it. I didn’t even realize this until I saw her chewing something and got it out of her mouth. Thankfully she was ok, but my stamp was not! I wish I had taken a picture of it, but I was so upset that I tossed it before I even thought about it!


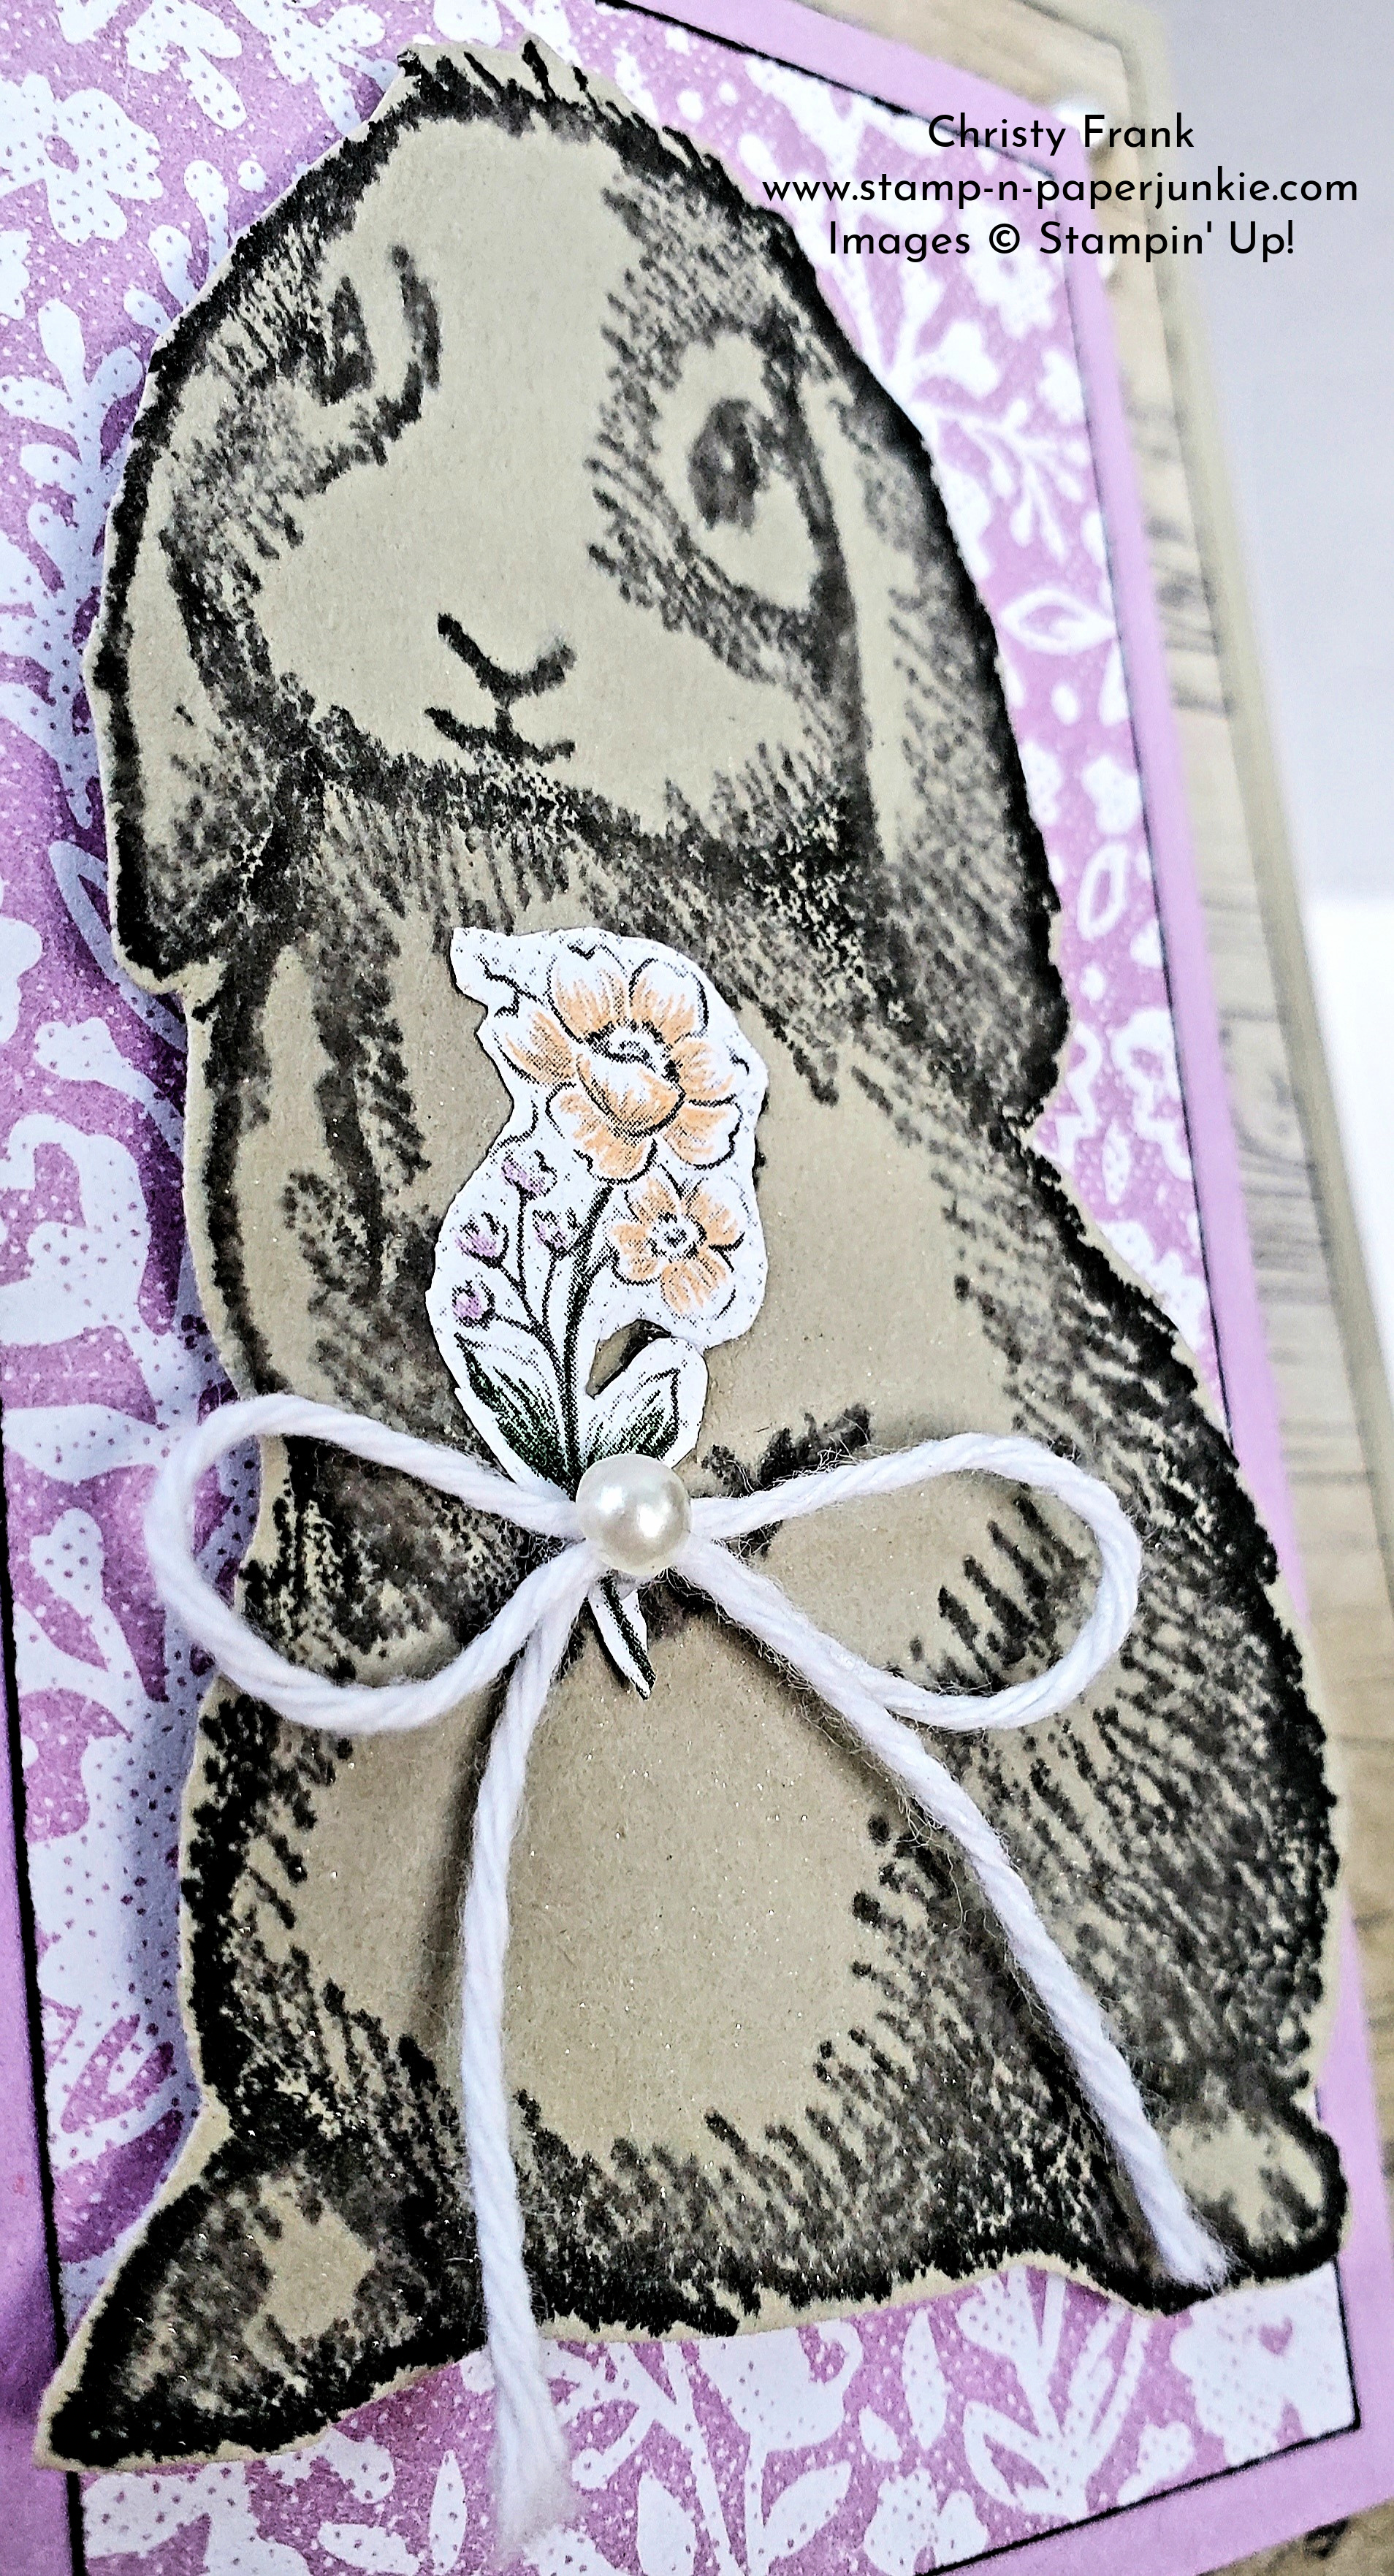
The Heart & Home DSP has a vintage look that I adore. When I saw the Easter Friends stamp set I knew that I wanted to use it with the Heart & Home paper to make a sweet, vintage card for Easter.


When picking the paper, I wanted to use one of the wood grain prints. To give it some color, I used a blending brush and Sahara Sand ink. This gave the perfect look of distressed wood.

Measurements:

Main Card Base

  • Sahara Sand 5 1/2 x 8 1/2, scored at 2 1/8 and 4 ¼
  • Floral DSP 1 7/8 x 5 ¼
  • Wood Grain DSP 4 x 5 1/4

Small Z fold

  • Fresh Freesia 3 3/4 x 6 1/4, scored at 2 1/8 and 4 ¼
  • Floral DSP 1 7/8 x 3 ½
  • Basic White 1 7/8 x 3 1/2

Bunny

  • Sahara Sand 2 x 3

Assembly:

  • Adhere the floral DSP and Wood Grain DSP to the Sahara Sand card base. The floral DSP goes on the left panel and the Wood Grain DSP goes on the right panel, leave the center panel blank. Fold the card mountain on the first score line and valley on the next.
  • Adhere the floral DSP and Basic White cardstock to the Fresh Freesia small Z fold piece. The floral DSP goes on the left panel and the Basic White cardstock goes on the right panel, leave the center panel blank. Fold the card mountain on the first score line and valley on the next.
  • Attach the small Z fold to the card base, centering the small rectangle top and bottom. Rather than centering left to right, I decided to slightly offset the front to show more of the floral DSP on the left front panel. To attach the two panels, I put the pieces together and put liquid glue on the edge of the front flap of the small Z fold and attach that first. Then I use liquid glue applied to back of the small Z fold and attach that.


  • I stamped the bunny in basic gray and used Wink of Stella to blend and soften the lines which also pulls a slight bit of color into the image. It is hard to capture the shimmer in a photo, but it is the perfect touch on this sweet bunny. I used dimensionals to attach it to the small Z fold.


  • The bunny just looks like it should be holding something so I fussy cut a small flower from the floral DSP and added a small bow using white baker’s twine. I added pearls in the upper right corner of the back panel and one to the center of the bow.

Thank you so much for hopping along with us today! Jessye is up next and I know you will love what she has to share!! You can click the next picture below or click on her name in the list below.


Sharon Lim - CA


Christy Frank – CA →You are here


Jessye Chancey - GA


Laurie Bradshaw - CA


Tammy Civello - CA


Teri West - AK


Sandra Hernandez - GA


Dawn Sander - CA


Danielle D. Diaz - CA


Wendy Varron - MD


Patty Bennett - CA